We are done with the wonderful month of August and it's time for Bakin' Friends reveal! If you are new here, this group connects bakers (bloggers and non-bloggers alike) and we share our baked goods with one another. Through our common love for baking, we cultivate friendships across the country via USPS! Each month our leader, Steph of Steph's Bite by Bite, chooses a secret ingredient that we all incorporate into our baked goods. See the past few months here and here.
The secret ingredient for August: PRETZELS! I was lucky to be matched with the wonderful Latane Stacy, a mommy of two beautiful kids. She sent me these butterscotch chocolate chip cookies with pretzels you see below. They are seriously the softest cookies I have ever had and they melt in your mouth. The recipe uses a mixture of cake flour and bread flour and I'm guessing this is responsible for the softness. They are called the BEST cookies by the NY times for a very good reason. So delicious that they only lasted a night; well an our to be exact. That was the saddest part. Thankfully, she included a beautifully handwrittem recipe and I am going to try to replicate her magic cookies. So can you too, I typed it up for you :)
Thank you very much Latane for the AMAZING cookies! They were delicious and a big hit in my house.
If you would like to join this wonderful group (you don't have to be a blogger, you just have to love to bake), you can read all about it here and sign up here.
Butterscotch Chocolate Chip Cookies with Pretzels
From: Latane Stacy; adapted from NY Times Best Chocolate Chips Cookies
Yield: 1 1/2 dozen 5-inch cookies
Ingredients
2 cups minus 2 tablespoons cake flour
1 2/3 cups bread flour
1 1/4 teaspoons baking soda
1 1/2 teaspoons baking powder
1 1/2 teaspoons coarse (kosher) salt
1 1/2 cups unsalted butter, room temperature
1 1/4 cups light brown sugar
1 cup plus 2 tablespoons granulated sugar
2 large eggs, room temperature
2 teaspoons vanilla extract
about 11 ounces bittersweet chocolate chips, at least 60% cocoa content (she used Ghiraldelli 60% chips)
6 ounces butterscotch chips
2 cups tiny pretzels, chopped
Directions
In a medium bowl, sift together the flours, baking soda, baking powder and salt.
In the bowl of an electric mixer, cream the butter and sugars until very light, about 5 minutes on medium.
Add eggs, one at a time, mixing well after each addition. Stir in vanilla. Reduce the speed to low and add the dry ingredients. Mix until just combined, 5-10 seconds. Mix in chocolate chips and butterscotch chips until incorporated. Press plastic wrap against dough and refrigerate 24-36 hours.
Preheat oven to 350 degrees F. Line a baking sheet with parchemnt paper.
Scoop large golf ball sized mounds of dough onto baking sheet. Press pretzels into each mound of dough. Add extra chocolate or butterscotch chips for a more atttractive cookie.
Bake until golden brown, about 17-20 minutes. Transfer to wire rack and allow to cool completely.
Friday, August 30
Wednesday, August 28
Mixed Berry Slab Pie {Guest Post}
I am very excited to be guest posting over at The Spiffy Cookie today!
Erin, the brains behind The Spiffy Cookie, is a PhD student like me and fortunately she is at the end of her studies. But now she has all these experiments to finish up, research articles to write and publish and write a freaking book of a dissertation (I am not looking forward to this part at all).
During this stressful time, a few of her blogging friends are helping her out to keep her blog alive. I'm so glad to be one of her blogging friends and excited to be guest posting for her today!
For my visit, I brought this mixed berry slab pie to share with her readers. Head over there now to check out her blog and get the recipe for this perfect summer pie.
Monday, August 26
Brown Butter Blueberry Muffins
Hey folks, I hope you had a great weekend! I was able to unplug from the interwebs and enjoyed a relaxing day at the lake with the husband on Saturday. And on Sunday I ventured to the Great NY State Fair with my sister-in-law, her 12-year old daughter and a friend. We had a great time and may have spent way too many hours there that my feet still hurt.
On the blog front, things have been clearly slow. I have not moved yet thanks to one big unforeseen complication that has delayed the process and we are playing the waiting game. Let me explain. When I bought my domain name (blahnikbaker.com) I did it through Google who registered it with GoDaddy.com. This was eight months ago. So when the move was being talked about a few weeks ago, I told Jessica (the website designer) that I have a registered domain already and it is through Godaddy. Based on that, she scheduled the move to happen over the weekend, needing only two days to have everything taken care of and I would be up and running by Monday with a new design.
But of course that didn't happen, we didn't even get to start the move. Apparently the first step of these things is to transfer your domain name to your new host. Well turns out Google had switched my registration from Godaddy to some other company that is the slowest in the world in giving you the information you need to move your domain name. It's not available on their website and you have to contact their mighty slow customer service and wait for an approval to transfer your domain registration which will take up to 5-7 business days. So here we are still waiting on them.
Lesson learned: Research domain registrations before taking the plunge. If you have already taken the plunge, reassess the next time you are up for renewal. People seem to love Godaddy, and I would suggest you register your domain yourself with them and not go through Google or anyone else that might complicate your life in the future. If you would like to know where not to register your domain, email me.
End of rant!
With that, there are these brown butter blueberry muffins we must attend to! By now you should know my love for brown butter (you don't?? I thought we were friends. See here and here). As we are saying goodbye to August and the last week of summer, fresh berries at the farmers market will be a thing of the past soon. So here is to enjoying blueberries before they are out of season! These brown butter muffins are a great morning pick-me-upper and an easy to-go breakfast. They are moist and as always the brown butter provides a deep flavor and aroma that only enhances the taste buds. If you are one of those that dislike blueberries, then make these muffins with your favorite berry. Just hurry before the berries go!
Brown Butter Blueberry Muffins
Yield: 12 muffins
Adapted from Joy the Baker
Ingredients:
7 tablespoons unsalted butter
1/3 cup milk
1 large egg
1 large egg yolk
1 teaspoon vanilla extract
1 1/2 cups all-purpose flour
3/4 cup sugar
1 1/2 teaspoons baking powder
3/4 teaspoon salt
2 cups fresh blueberries
For topping:
3 tablespoons unsalted butter, cold and cut into cubes
1/2 cup all-purpose flour
3 1/2 tablespoons sugar
Directions:
Preheat oven to 350 degrees F. Line muffin tin with liners.
To brown butter: In a small saucepan set over medium heat, melt butter. Whisk butter constantly and cook down until brown bits appear in the pan. Remove from heat.
In a small bowl, combine milk, egg, yolk and vanilla extract. Add the brown butter and whisk to combine.
In a medium bowl, whisk together flour, sugar, baking powder and salt. Add wet ingredients all at once and stir gently to combine. Fold in the blueberries. Be careful not to over-mix.
Divide the batter equally among the prepared muffin cups.
Make topping by combining all the ingredients in a small bowl. Rub together until crumbly. Sprinkle over muffins.
Bake for 18-20 minutes or until golden and a toothpick inserted into the center comes out clean.
Let muffins cool in pan for 15 minutes before removing from pan. Serve warm.
On the blog front, things have been clearly slow. I have not moved yet thanks to one big unforeseen complication that has delayed the process and we are playing the waiting game. Let me explain. When I bought my domain name (blahnikbaker.com) I did it through Google who registered it with GoDaddy.com. This was eight months ago. So when the move was being talked about a few weeks ago, I told Jessica (the website designer) that I have a registered domain already and it is through Godaddy. Based on that, she scheduled the move to happen over the weekend, needing only two days to have everything taken care of and I would be up and running by Monday with a new design.
But of course that didn't happen, we didn't even get to start the move. Apparently the first step of these things is to transfer your domain name to your new host. Well turns out Google had switched my registration from Godaddy to some other company that is the slowest in the world in giving you the information you need to move your domain name. It's not available on their website and you have to contact their mighty slow customer service and wait for an approval to transfer your domain registration which will take up to 5-7 business days. So here we are still waiting on them.
Lesson learned: Research domain registrations before taking the plunge. If you have already taken the plunge, reassess the next time you are up for renewal. People seem to love Godaddy, and I would suggest you register your domain yourself with them and not go through Google or anyone else that might complicate your life in the future. If you would like to know where not to register your domain, email me.
End of rant!
With that, there are these brown butter blueberry muffins we must attend to! By now you should know my love for brown butter (you don't?? I thought we were friends. See here and here). As we are saying goodbye to August and the last week of summer, fresh berries at the farmers market will be a thing of the past soon. So here is to enjoying blueberries before they are out of season! These brown butter muffins are a great morning pick-me-upper and an easy to-go breakfast. They are moist and as always the brown butter provides a deep flavor and aroma that only enhances the taste buds. If you are one of those that dislike blueberries, then make these muffins with your favorite berry. Just hurry before the berries go!
Brown Butter Blueberry Muffins
Yield: 12 muffins
Adapted from Joy the Baker
Ingredients:
7 tablespoons unsalted butter
1/3 cup milk
1 large egg
1 large egg yolk
1 teaspoon vanilla extract
1 1/2 cups all-purpose flour
3/4 cup sugar
1 1/2 teaspoons baking powder
3/4 teaspoon salt
2 cups fresh blueberries
For topping:
3 tablespoons unsalted butter, cold and cut into cubes
1/2 cup all-purpose flour
3 1/2 tablespoons sugar
Directions:
Preheat oven to 350 degrees F. Line muffin tin with liners.
To brown butter: In a small saucepan set over medium heat, melt butter. Whisk butter constantly and cook down until brown bits appear in the pan. Remove from heat.
In a small bowl, combine milk, egg, yolk and vanilla extract. Add the brown butter and whisk to combine.
In a medium bowl, whisk together flour, sugar, baking powder and salt. Add wet ingredients all at once and stir gently to combine. Fold in the blueberries. Be careful not to over-mix.
Divide the batter equally among the prepared muffin cups.
Make topping by combining all the ingredients in a small bowl. Rub together until crumbly. Sprinkle over muffins.
Bake for 18-20 minutes or until golden and a toothpick inserted into the center comes out clean.
Let muffins cool in pan for 15 minutes before removing from pan. Serve warm.
Friday, August 23
I'm Moving!
Blahnik Baker is moving and it's new home will be over at Wordpress. Let's just say, it is time for a move and leave it at that! No one has time to list (or read for that matter) my frustrations for the past two months.
The big move is scheduled for tomorrow and the site will be down for a few hours when the lovely Jessica from Jessica Kate Designs will be working her magic. She will make sure it is up and running at least in part to have all your favorite recipes by Sunday and the rest of the changes will occur slowly.
If you want to visit my site over the weekend please visit blahnikbaker.blogspot.com. If you type in my normal URL - blahnikbaker.com you might not be able to reach my website. Otherwise it will be business as usual on Monday at blahnikbaker.com with an updated look and some new features for my readers.
The move won't affect most of you once we are live again but for those of you following the blog through Google Friend Connect, please be sure to follow another way either through Facebook, Google+, Pinterest or get updates via email.
Hopefully, I'll be live again on Monday!! Have a great weekend friends!
Thursday, August 22
Elvis S'mores Cake {#PasstheCookBookClub}
All the recipes in this month's selection are very tempting; thus why I am buying the book! From the Cheddar Breakfast Swirl Breakfast Buns, to the Tomato Scallion Shortcakes with Whipped Goat Cheese and this S'mores Layer Cake. I intend to make all the above soon but of course I was naturally drawn to the layer cake. I just love making layer cakes and I couldn't resist.
Since I've made traditional s'more recipes recently (s'more cookie bar and s'mores macarons), I wanted to switch the cake up a little bit. As always, I asked Mr J what he thinks would be a great variation and of course he said peanut butter. I swear this man is addicted to peanut butter and needs some therapy (just saying; PB anonymous?). But since he eats a majority of what I make, I indulged him. A few Google searches lead to the decision of peanut butter banana s'mores cake aka Elvis S'mores.
I made the graham cracker cake as the recipe suggested but I smothered it with a creamy milk chocolate peanut butter ganache instead and added some fresh sliced bananas. Finally the cake is topped with marshmallow frosting! The frosting is pretty thin and not my usual 'cake' frosting so it was very hard to work with and beautify.
It is not the prettiest cake I've made (probably the ugliest, still debating) but for now it wins the award for the best cake ever according to the hubby. The graham cracker cake is moist and fluffy (just the way I like my cakes) and the peanut butter ganache running in the middle is perfectly sweet and is not overpowering that you lose the graham cracker and subtle banana flavors. Don't get me wrong, there is plenty peanut butter flavor here but it is well balanced. It's the first time I've ever seen Mr J. lick his plate clean (Instagram picture). Apparently it was that good. Feel free to add more bananas as several labmates suggested they would have liked more of the banana in there.
Elvis S’mores Layer Cake
Ingredients:
Cake:
1 cup (2 sticks) unsalted butter, softened, plus a bit more for greasing pan
2 cups flour
2 cups honey graham crackers (not cinnamon graham crackers), finely processed into a powder
2 teaspoon baking powder
¾ teaspoon baking soda
¾ teaspoon salt
½ teaspoon ground cinnamon
2/3 cup granulated sugar
1 cup dark brown sugar
4 large eggs, room temperature
2 cups buttermilk, well shaken
Filling:
½ lbs milk chocolate Reese's peanut butter cups, finely chopped
¾ cup heavy cream
Pinch of salt
1-2 bananas, sliced
Frosting:
4 large egg whites
1 cup granulated sugar
¼ teaspoon cream of tartar
1 teaspoon vanilla extract
Directions:
To make the cake: preheat the oven to 350 degrees F. Butter two 9” round cake pans, line them with parchment paper, and butter that.
In a medium bowl, whisk together the flour, graham cracker crumbs, baking powder, baking soda, salt, and cinnamon. Set aside. In a large mixing bowl, cream the butter and sugars together until light and fluffy. Add the eggs, one at a time, scraping down the sides of the bowl as needed. Add a third of the dry ingredients, then half of the buttermilk, and repeat mixing after each addition until combined. Scrape down the bowl and mix again if needed.
Divide the batter between the cake pans, smoothing tops. Bake until a toothpick inserted into the center comes out clean, about 30-35 minutes. Cool in pan on rack for 20 minutes, then run a knife between the cake edges and pan before inverting each layer on a rack. Discard the parchment paper and flip the cakes back upright on the rack. Let cool completely. (a process you could speed up by placing cakes in the fridge).
To make the filling: Place the chocolate in a heatproof bowl. Combine the heavy cream and salt in a small saucepan, and bring to a simmer. Pour over the chocolate and let sit for 1 minute, then whisk until smooth. Set bowl over another bowl filled with ice water and stir until it firms up to a spreadable consistency.
Make the frosting: Place egg whites, granulated sugar, and cream of tartar in a heatproof bowl of an electric mixer. Set over a saucepan with simmering water. Whisk constantly until sugar is dissolved and whites are warm to the touch, about 3 minutes. Transfer the bowl to an electric mixer fitted with the whisk attachment, and beat, starting low and gradually increasing to high, until stiff glossy peaks form, 4 to 7 minutes. Add vanilla and mix until combined. Use immediately.
Assembly: Use a long serrated knife to level the top of the cakes; gently taking off the domed part. Place one cake layer face up and spread peanut butter ganache thickly over the bottom layer. Scatter the banana slices over the ganache. Place top layer over the bottom. Chill the cake for 10-15 minutes. Frost the cake by spreading a thin layer over the top and sides, covering for crumbs. Transfer to fridge for 5 to 10 minutes, and let sit. Then generously coat top and sides with additional frosting. Put the remaining frosting in a piping bag fitted with a large round piping tip. Create big marshmallow dollops decoratively over the top of the cake. Dipping your finger in water between each dollop to push down the top of each where you pulled the piping bag away. With a kitchen torch on low, lightly brown the dollops, creating the toasted marshmallow effect.
Below is what everyone else in the club made!
Wednesday, August 21
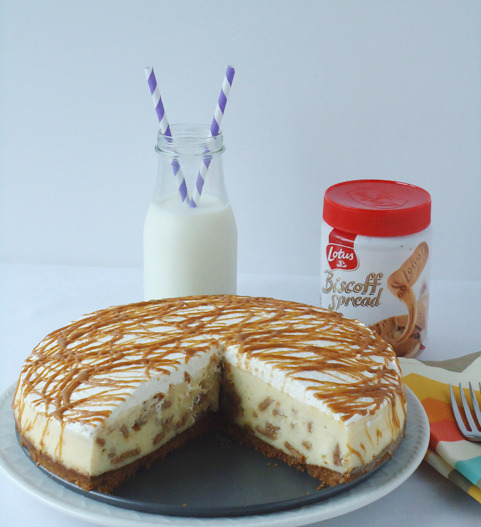
White Chocolate Biscoff Cheesecake

Growing up in Sierra Leone, most of our sweets were from Europe like Cadbury dairy milk chocolate and Speculoos cookies. The Speculoos cookies were one my favorites and even as a child I loved the mix of cinnamon, nutmeg and ginger that makes them perfectly spiced cookies. So when I was asked by Lotus Bakeries (the makers of Speculoos aka Biscoff cookies) to try their new Biscoff Cookie Spread, I was honored and on cloud nine with giggles. Of course I said yes and couldn't wait to receive the samples.
Biscoff cookie spread is made from Speculoos cookies; they found a way to convert the cookies into a creamy and crunchy spread (smart cookies right?). Both spreads are made with all-natural preservative-free ingredients. The spread is vegan and nut-free so it's perfect for those with nut allergies. It tastes just like the cookies, perfectly spiced and it is just as I remembered, except now I can have it with many things. It is simply irresistible!

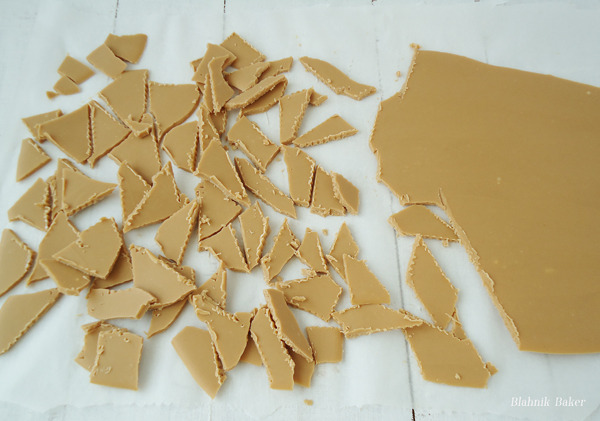
One jar later, I made this white chocolate biscoff cheesecake. I used biscoff cookies as the crust for the cheesecake and the filling is rich white chocolate with bits of biscoff spread morsels. I made the morsels to include a little bit more biscoff creaminess in the cheesecake. I simply melted white chocolate with the biscoff cookie butter and spread thinly on a wax sheet, allowed to chill for a few hours and then broke them into small pieces. These were folded into the cheesecake filling right before baking.

Be warned, this is a very rich cheesecake and every bite is creamy and crunchy at the same time. The cheesecake has all the flavors of my childhood favorite cookie that will remain fondly in my memory! If you have not tried this spread yet, RUN! You can find it in your grocery store, in the peanut butter aisle. I have a Pinterest board with more ideas of how to enjoy the spread!

White Chocolate Biscoff Cheesecake
Ingredients:
For crust:
2 cups Biscoff cookie crumbs (1 8.8 oz package Biscoff Cookies)
3 tablespoons butter, melted
For the filling:
3 8 ounce cream cheese blocks, softened at room temperature
1 cup sugar
4 ounces white chocolate, melted
1 ½ tablespoon all-purpose flour
1 ½ tablespoon heavy cream
¼ teaspoon salt
2 teaspoon vanilla extract
3 eggs, room temperature
1 ½ cups biscoff-white chocolate bark chunks (see instructions below)
For mousse:
½ cup cool whip, softened
4 ounces cream cheese, softened
2 ounces white chocolate, melted
1 ½ tablespoons sugar
½ teaspoons vanilla extract
Extra Biscoff Creamy Spread for drizzling
Directions:
Make ahead: To make the biscoff-white chocolate bark, melt 4 ounces of white chocolate and ½ cup biscoff creamy spread. Spread thin over a sheet of parchment paper on a baking sheet. Chill for at least two hours. Cut up bark into small chunks and set aside.
Preheat oven to 350 degrees F. Wrap the entire outside of a 9-inch spring -form pan with two sheets of foil. Using a food processor, pulse the cookies into a fine crumb. (You could measure the crumbs here before adding the sugar) Add the melted butter and process until combined. Transfer the crumbs to the prepared pan and evenly spread it. Use a flat bottom cup and press down on crust to create and even layer. Bake crust for 10 minutes. Let cool while you prepare the filing.
Reduce oven temperature to 325 degrees F.
In the bowl of an electric mixer, beat the cream cheese on medium speed until smooth and creamy, about 2 minutes. Add sugar and mix until combined, another minute, scraping down bowl as needed. Add in melted white chocolate, flour, heavy cream, salt and vanilla extract. Mix well on medium-low speed. Reduce speed to low and add eggs in one at a time, mixing until combined. Mix filling until smooth for an additional minute.
Using a rubber spatula, stir in the biscoff-white chocolate bark chunks by hand. Pour filling into spring-form pan with crust. Place spring-form pan into a much larger baking pan. Add hot water into the larger baking pan to reach half way up the side of your spring-form pan.
Bake at 325 degrees F for one hour. Then turn off the oven and leave the cheesecake in the oven for additional 45 minutes. Remove cheesecake from oven and allow to cool at room temperature for at least an hour before chilling. Chill for 6 hours or overnight.
The next day, mix together all the ingredients for the mousse in a medium bowl until smooth and slightly thickened. Remove the sides from the spring-form pan and spread the mousse mixture on top of the cheesecake. Smooth evenly.
Chill for four hours or overnight before serving.
Store covered in refrigerator.
Biscoff Spread is a sweet, creamy spread made with Biscoff Cookies. Try this delicious European alternative to peanut butter or chocolate spread. Vote for the best photo in Biscoff’s “Spread the Love” contest and you could win a year’s supply of Biscoff products!
This is a sponsored conversation written by me on behalf of Biscoff. The opinions and text are all mine.
Sunday, August 18
Peach Blueberry Bourbon Cake
Goodbyes
They stink.
This weekend, I had the endearing task of saying goodbye. One of my dearest girlfriends is moving to San Diego with my (her) baby! She graduated with her PhD two weeks ago and landed a dream job on that side of the country. However, we’ve seen each other almost every day for the past few years and I don’t even know what I am going to do without her. To say I will miss her is an understatement. But I am extremely happy for her and can't wait to visit already.
They stink.
This weekend, I had the endearing task of saying goodbye. One of my dearest girlfriends is moving to San Diego with my (her) baby! She graduated with her PhD two weeks ago and landed a dream job on that side of the country. However, we’ve seen each other almost every day for the past few years and I don’t even know what I am going to do without her. To say I will miss her is an understatement. But I am extremely happy for her and can't wait to visit already.
On the bright side, while we were cleaning out her apartment this week, I inherited the contents of her liqueur cabinet. Her quality bourbon had to be put into good use before
she left. And because I was floating in fresh peaches and blueberries, this cake happened. I don't know if this is a cake or an open pie or even a cobbler. It resembles all the above.
But what I do know is that it is very good. A buttery pastry dough is filled with fresh peaches and blueberries macerated with lemon juice and bourbon. It's baked in a unique way and that's what drew me to the recipe in the first place. The pastry dough is made in a food processor and pressed in a springform pan which is then filled with the fruit filling. The outside tastes like cake and the inside is gooey like a pie. It's bursting with summer freshness so make this before the summer berries and fruits go away.
Peach Blueberry Cake
Barely adapted from Annie's Eats
Ingredients
For crust:
3 cups all-purpose flour
1 cup sugar
2 teaspoons baking powder
1/2 teaspoon salt
1 cup unsalted butter (2 sticks), cold and cut into cubes
2 large eggs
2 teaspoons vanilla extract
For filling:
3/4 cup sugar
3 tablespoons all-purpose flour
2 tablespoons quick-cooking tapioca
5 peaches, cut into 8 pieces each
2 cups blueberries
1 1/2 tablespoons lemon juice
1-2 tablespoons bourbon (to taste)
Directions
To
make the crust: In the bowl of a food processor, combine the dry
ingredients by pulsing for a minute. Add in butter cubes slowly and
pulse until the mixture is coarse, forming small pea-sized bits. Add
eggs and vanilla extract. Pulse until dough comes together into a bowl.
Form dough into a ball and transfer to a 9-inch springform pan. Spread
dough evenly up the sides of the pan and the bottom. Press down with
your fingers or a flat bottomed cup. Chill in fridge for 10 minutes
while you prepare the filling.
For
filling: In a large bowl, combine sugar, flour and tapioca. Add in the
peaches, blueberries, lemon juice and bourbon. Gently mix to combine and
coat the fruit. Pour the filling into the prepared dough, making sure
it is evenly spread out. Be careful not to add extra liquid into the
dough.
Cover
the springform pan loosely with foil and place on a baking sheet. Bake
until filling is bubbling and crust is golden, about 1 hour and 30
minutes. Let cake cool in pan for at least 20 minutes before carefully
removing the sides of the pan. Let cool until warm before cutting.
It's best served warm and with ice cream!
Notes:
-
The filling was a little runny after baking so I would suggest letting
the filling sit for 10-15 minutes before pouring into pastry dough. The
tapioca will have time to work its magic.
Friday, August 16
Oatmeal Chocolate Chip Cookies
As we speak I am without Internet and cable. It’s been four
days and counting. It’s frustrating to say the least especially when you rush home for the cable guy and he never shows up. Is having cable crucial for survival? NO. But Internet. Yeah, kind of necessary (My sister is rolling her eyes as she reads this in an Internet cafe in Sierra Leone where she pays ~$3 every week to use the internet and read my ramblings on this blog. I love you Alex and I'll bring you a cookie soon!).
But back to my ramblings. I am not one of those people who
would think no Internet is liberating or would go find something in nature to do with
my time. I make plans, schedules and not having Internet this week was not one
of those. My plan for the week was catch up on my blog reading after being away all last week, do some recipe
research (aka pinteresting) and write some posts before we get to another busy
weekend. But no, none of that has happened.
Instead, guess what happened?? Random thoughts. Lots of random thoughts. I won't bore you with all of them. But this thought crossed my mind a few times: “This is the last year of my 20s!” The thought was frightening so I distracted myself by baking some cookies. Not these ones
here though.
These oatmeal chocolate chip cookies were
made last week for a special friend. To thank her
for the wonderful birthday present she sent in the mail. They are particularly chewy and the lack of
butter in them makes me smile and reach for more. Oh also, they are not
too sweet which makes them perfect for breakfast! I may have had a few with my morning tea, just saying.
Oatmeal Chocolate
Chip Cookies
Yield: ~15 – 20
cookies
Ingredients:
1 cup whole wheat flour
½ teaspoon baking soda
1 teaspoon baking powder
½ teaspoon salt
½ teaspoon cinnamon
¼ teaspoon nutmeg
2 tablespoons coconut oil, solid
1 cup light brown sugar
1 egg
1/3 cup apple sauce
1 teaspoon vanilla extract
1 cup chocolate chips
2 cups old-fashioned oats
2 tablespoons flaxseeds
Instructions
Preheat oven to 350 degrees F. Line baking sheet with
parchment paper.
In a medium bowl, whisk together the flour, baking powder,
baking soda, salt, nutmeg, cinnamon, oats and flaxseeds
In another large bowl, mix the coconut oil and the sugar on
medium speed. Add the egg, mix until combined. Then add the applesauce and
vanilla extract.
Add the flour mixture and stir by hand until just combined.
Stir in the chocolate chips.
Drop tablespoon sized cookie dough balls onto a baking sheet
and flatten each cookie slightly. Bake 10-12 minutes or until the cookies are
lightly brown on the edges. Cool on baking sheet for three to four minutes
before transferring to a cooling rack.
Adapted from Bakerita
Any plans for the weekend? Other than hoping the
cable man shows up for his 6PM appointment tonight, I have one heart-breaking goodbye that I
am not looking forward to (one of my dearest friends is moving clear across the country) and a flea market date with the hubby I am
excited about.
Hope you all have a great weekend!!
Monday, August 12
Dark Chocolate Salted Caramel Cupcakes
Despite today being Monday, I am not feeling the usual Monday blues because of the wonderful wedding of the weekend. There is something about weddings that just puts one in a very good mood. Or I might just be a romantic at heart and it's about time I stop denying it.
My friend's wedding was a beautiful fairytale; one of those you see in a chick flick movie. The bride is a country girl and throughout the planning we struggled to combine that with a simple/ elegant theme. At the end of the day, she pulled it off perfectly. She got married in the beautiful backyard grounds of her childhood, above a creek where she rode down to the ceremony in a horse and carriage. Yes, not kidding. Her mother surprised her with that. It was super awesome and was definitely a tear jerker. The reception and party were held in an elegantly decorated tent, studded with shades of purple (regency and wisteria to be exact) and hints of the couple's favorite pastime: fishing. We danced our (troubled) feet out till the wee hours celebrating the newlyweds. I am still recuperating from all the excitement and jello shots!
Ok, I'm sure you are not here for wedding details but for these decadent cupcakes. I made them for friends last weekend during my birthday celebrations. I called them dark chocolate salted caramel cupcakes but the consensus was "Mocha chocolate goodness" and I think that describes them perfectly. It's a moist dark chocolate cake that is topped with salted caramel buttercream.
I made homemade caramel sauce, using this recipe from Two Peas and their Pod, and used it in the frosting. The sauce is SO good on it's own and we have been drizzling it on everything from ice cream to cookies. Next time I make these cupcakes, I will fill them with the salted caramel sauce for some added oomph. You totally should if you would like added salted caramel flavor!
If you've ever had a salted caramel mocha drink at Starbucks, then this is it in a cupcake form. A very decadent chocolate cake with a sweet and salty topping!
Yield: ~12-15 cupcakes
Ingredients:
For Chocolate Cupcakes:
1 cup all-purpose flour
1 cup sugar
1/3 cup Cocoa powder (I used Ghirardelli)
1 teaspoon baking soda
½ teaspoon baking powder
½ teaspoon salt
1 egg, at room temperature
1/2 cup buttermilk, at room temperature
½ cups strong black coffee, hot
1/4 cup vegetable oil
1½ teaspoons vanilla extractFor Salted Caramel Swiss Meringue buttercream
5 egg whites, room temperature
1 1/4 cup sugar
1 ½ cup (3 sticks) unsalted butter, room temperature
½ cup homemade salted caramel sauce (recipe I used: here)
2 teaspoon vanilla extract
Directions:
For the Cake:
- Preheat oven to 350 degrees F. Line muffin tins with cupcake liners.
- Sift together all the dry ingredients in the bowl of an electric mixer.
- In a medium bowl, combine all the wet ingredients using a whisk.
- Mix the dry ingredients on low speed for 1 minute. Stop the mixer and add the wet ingredients. Mix for 2 minutes on medium speed and scrape the sides and bottom of bowl. Mix for additional minute on medium speed.
- The batter will be thin. Divide evenly among the cupcake liners.
- Bake for 12-15 minutes or until a toothpick inserted in the center comes out almost clean.
- Cool cupcakes on wire racks completely. Meanwhile you could start on the frosting.
For Salted Caramel Swiss Meringue buttercream:
- Whisk together sugar and egg whites in a heatproof mixing bowl set over (not in) a pan of simmering water. Whisk until warm and sugar is dissolved (mixture should feel completely smooth when rubbed between your fingers), 2 to 3 minutes. Remove from heat.
- With an electric mixer on medium speed, whisk egg white mixture 5 minutes (using the whisk attachment). Increase speed to medium-high, and whisk until stiff, glossy peaks form and meringue has cooled (test by feeling bottom of bowl), about 6 minutes.
- Reduce speed to medium and switch to the paddle attachment. Add butter, one piece at a time, beating well after each addition. Beat in vanilla. Mix the salted caramel into the buttercream.
- Use immediately or store in an airtight container in fridge for up to a week.
Hope you have a great start to the week!!
Friday, August 9
S'mores Macarons
Hey guys! I'm still out of town for a wedding but I had to pop in to share with you these s'mores macarons. Just in time for National S'mores Day! Yes, there is a whole day dedicated to celebrating s'mores. I won't complain considering my love for them :)
These macarons were a product of my s'more addiction a few weeks ago that lead to these s'more cookie bars. You know I love macarons (here and here) but they are so finicking that I am making them less now. But these were a success on the first try and the second!
I made graham cracker macarons and filled them with marshmallow creme and chocolate frosting. I may have over piped the chocolate frosting and marshmallow filling (sorry but not sorry). I loved how puffy these little sandwiches turned out. They were perfectly crunchy and sweet and they tasted just like a traditional s'more! If you need a twist on the traditional s'more, then you need to try these. They make for a pretty display too at any summer event :)
I hope you all have a great weekend!!
S'more Macarons
Yield: 30 macarons
(Inspired by Chocolate & Carrots)
Ingredients:
3 egg whites
1/3 cup sugar
1/2 cup graham cracker crust
2 cups powdered sugar
1 cup almond meal
Marshmallow frosting
1/2 cup powdered confectioners’ sugar, sifted
1/2 cup (1 stick) butter, at room temperature
½ teaspoon pure vanilla extract
1 cup Marshmallow Fluff (~half of the 7.5oz jar)
Chocolate frosting
Directions:
Line two sheet pans with parchment paper. I used a 1½-inch round cookie cutter to draw circles on the parchment paper and flipped the paper (drawing side down).
Preheat oven to 280 degrees and prepare a pastry bag with a round tip. I used Wilton 2A.
In the bowl of an electric mixer with the whisk attachment, combine the egg whites and sugar. Whip on medium-high speed until stiff peaks forms, about 5-7 minutes.
Using a food processor, pulse the powdered sugar, almond flour and graham cracker crust into fine powder. Sift several times until there is less than 2 tablespoon of almond bits left.
Add the dry ingredients to the meringue and fold with a rubber spatula. Gently fold to deflate the meringue by pressing against the side of bowl and scooping from bottom until batter is smooth and shiny; about 20-25 folds. To check consistency, drop a spoonful of batter and it should have a peak that quickly relaxes back into the batter. Start checking the batter after 20 folds.
Transfer batter into pastry bag and pipe the batter into the pre-traced circles on the baking sheet. Tap baking sheet hard on counter to release any air bubbles trapped in the batter.
Bake for 15-20 minutes until hard and slightly golden, rotating cookie sheets halfway through baking time. Cool completely on cookie sheets before peeling from the parchment.
For the Marshmallow frosting
In an electric mixer fitted with the paddle
attachment, beat the butter and icing sugar on low until combined, about 1
minute. Add vanilla and increase speed to medium and beat for about 3 minutes. Add the marshmallow fluff. Use immediately.
Wednesday, August 7
Cherry Coconut Popsicles
Girlfriends are just the best and having them (far or near) is necessary. I was extremely lucky last year to have eight wonderful girls stand up with me as I was getting hitched. They traveled from Virginia, California, the Netherlands, Minnesota, Indiana, Sierra Leone and of course NY. So lucky to have them in my life!!
And this is why I am so happy to be heading out of town today to stand by my adopted 'baby sister' as she gets married this weekend! My girlfriend's sister is tying the knot and I'm super excited to be a part of her special day. It's also the first wedding in which I'm a bridesmaid. Remember the bridal shower we hosted? And I baked some cupcakes? Eeeep, tomorrow is our spa day with the bride and Friday is time for some last minute decoration prep, rehearsal and Saturday is the big day. Can't wait!
Ok these popsicles, I guess we should talk about them right? We had a heat wave a few weeks ago, hitting record heat in Central NY and in my need to cool down these popsicles happened. Twice. I didn't want to share them because the pictures are not that great...not a fan of popsicle picture-taking but the recipe is so simple and amazing I had to get over myself and share with you!!
If you don't already know this, I have a thing for coconut. Coconut flakes, coconut water and coconut milk are a staple in my pantry. It's not my fault, I was born in the tropics (at least, that's my reasoning). These popsicles are made with fresh cherries, the new Chobani coconut greek yogurt flavor and toasted coconut flakes (for added pizzazz).
They are simply creamy and refreshing! You have to try them before the summer is over. Cherries and coconut pair very well together and I am surprised this is my first encounter of their union.
As you can see I made these twice using the same ingredients. In one, I pureed the yogurt and cherries and in the other I kept them separate. Both taste amazing so do as you please!
Cherry Coconut Popsicles
Makes 4 popsicles
Ingredients:
1 cup fresh cherries, pitted
1 tablespoon granulated sugar (or to taste)
2 (6 ounces each) 2% Chobani Coconut Greek yogurt
3 tablespoons sweetened coconut flakes, toasted
Directions:
A)
Place the cherries in the bowl of a food processor (or blender) and puree until smooth. Add the rest of the ingredients and blend for another minute.
Pour the cherry puree into each popsicle mold. Insert a popsicle stick in the middle or top with popsicle mold cover if available. Freeze for at least 6-8 hours, preferably overnight. Enjoy!
B)
Puree the cherries and sugar in a food processor until smooth. In a separate small bowl, mix the yogurt and coconut flakes until combined.
Spoon the cherry puree into the bottom of each popsicle mold. Top with dollops of yogurt blend. Insert a popsicle stick and freeze for at least 6-8 hours.
Monday, August 5
Strawberry Lavender Cake
Happy Monday!
It's my birthday today and I made myself a birthday cake! A Strawberry Lavender Cake to be precise.
Apparently you are not supposed to make yourself a birthday cake but I wanted to and there was no stopping me. Who makes these rules anyway? Here was an opportunity to make myself whatever I want without worrying whether people will like it because it's my cake. Like this strawberry lavender cake; a great flavor combination.
This cake is straight up from my cake crush; Sweetapolita and I've had it at the back of my mind for months. Honestly, all her cakes are on my to-bake list. Like this chocolate marshmallow cake. But I digress. This strawberry lavender cake starts with a wonderfully moist vanilla buttermilk cake that is filled with a whipped vanilla mascarpone filling & strawberry and lavender compote and then topped with whipped lavender frosting. It's a mouthful, I know but it's just as amazing as it sounds!! Let me break it down for you.
First, there is a light, airy yet very moist cake. Rosie (Sweetapolita) uses an interesting mixing technique in making this cake. She adds cold butter to the dry ingredients and mixes to create a cornmeal consistency before mixing in the wet ingredients and this makes a light and fluffier buttermilk cake. The cake is filled with vanilla whipped cream, which is a perfect match for strawberries. I added mascarpone cheese to this for more richness and a little tartness. In addition to the whipped cream, the cake is also filled with a fresh strawberry, lemon and lavender compote that is sweet and full of summer flavors. Finally, a perfectly sweet whipped vanilla lavender frosting tops it all. Lavender is a beautiful flavor and if you haven't tried it yet, I suggest you do soon. It's my first time baking with it and I don't know why it took me this long.
I am not a big fan of birthdays to be honest. I hate being the center of attention and despite my love of presents, I don't throw birthday parties! My wedding took lots and lots of effort to walk out and be stared down...yikes! Anyway, I let my husband host two dinner parties for me this weekend and I resisted the urge to be involved in any of the planning except making this cake and some cupcakes I'll share later. Thanks to the great presents, I survived both parties! Oh I got a camera fund started by my friends. I am almost ready to shop for a DSLR!! I can't wait.
Recipe: From Sweetapolita
- The only change I made was adding mascarpone cheese (1/3 cup) to the vanilla whipped cream filling at the end.
Here is a look at the aftermath of this beauty.
Friday, August 2
What's a Blahnik?
I recently realized not everyone knows what Blahnik in this blog’s title refers to.
Silly me, I thought everyone knew what these beautiful things are! But, people
keep asking “What’s a Blahnik?” So, I figured it’s about time I answered the
question.
Simply put, Blahnik refers to shoes made by the famous
designer, Manolo Blahnik. But to me, it’s more than just a shoe. It symbolizes
friendship, perseverance, self-assurance, and the first chance at a fun dream.
Before we talk about what it means, we need to talk about when & where it
all started.
The story begins in St. Paul, MN, in a small two bedroom
apartment with a best friend and college roommate of 4 years. Instead of me
telling you this story, I asked her to share with you the story behind my
(slight) obsession with these shoes.
Here’s Dimpho:
********************************************************************************************************************************************
In college, Zainab and I, like most college aged girls,
were obsessed with Sex and the City.
During our junior year, Target had a Black Friday special, every season for
$10! We immediately jumped on it. Unfortunately, other people had the same idea
and Target sold out before we could acquire the entire series. Luckily, they offered rain checks. Over the next six months, we scoured Targets hoping
to complete our collection. Every time we purchased a new season, we’d sit down
and watch it end to end. For us, it wasn’t necessarily the storylines as much
as the style. The series taught us
about creating our own signature style. I thought of myself as a plain Jane
with funky accessories, while Zainab was into bold colors and patterns like the
time she had yellow pants. But both of us loved the shoes!!! Especially Carrie’s favorite designer, Manolo Blahnik. However, since
we were broke, we bought our heels from Payless
that pinched our feet, but we loved them.
In 2008, the first movie was released and of course,
Blahniks played a special role. We watched Carrie prancing all over Manhattan
in her Blahniks, hanging out with the girls, writing for Vogue, and planning
her wedding. She finally had it all. Until she didn’t. Her world fell apart
when she was left at the altar. At the end of the movie, what finally reunited her with her
one true love were a pair of satin, cobalt blue, crystal encrusted toe Manolo Blahniks.
Carrie left them behind and had to go retrieve the never-worn-before shoes, and
who happened to be waiting for her, shoes in hand? Her true love. He got down
on one knee, told her she was the one, and slipped the shoe on in the most
gentle and loving way. Cheesy? We know!
Fast forward to 2012 and my college roommate, best friend,
and sister for life is getting married. Who do you think she wanted to share
the special occasion with? Me of course but those satin, cobalt blue, crystal encrusted toe
Manolo Blahniks as well. And she did, walking down the aisle, posing for pictures, and
dancing the night away. Forever embedding a shoe into the history of our
friendship and the rest of her life.
********************************************************************************************************************************************
Thanks Dimps! I miss those days of just
vegging out all day on the couch and enjoying our DVDs. Who said growing up was fun?
What Dimpho didn’t mention, is the show helped me discover
my style, confidence, and comfort with my body. And that’s why I fell in love
with those shoes. Being a college
student and subsequently enrolling in graduate school for 6 long years meant my
dream of owning the shoes would not come true for a very long time. So instead, I kept a picture on my blackberry
and continued to slowly save towards fulfilling my dream of owning them one
day. For the first time in my life, I was pursing something other than a career
goal, and it meant a lot to me. When my future husband came into the picture,
he, of course, learned about my dream (or obsession!) and as a symbol of our love, he gave me the satin, cobalt blue, crystal encrusted toe Manolo
Blahniks as a wedding present!
So there you have it friends! The Blahnik in Blahnik Baker is about a dream, a
beautiful pair of shoes, and confidence in me. It may not have anything to do
with baking – but for me, the shoes and baking represent success and fulfillment
in my personal life and it just felt right for the title of my blog.
PS: this is the only picture where you
can see I am wearing the shoes! I forgot to raise the dress all day for the
pictures!
FYI: This is not a sponsored post and I was not compensated in anyway. I just really love Manolo Blahnik shoes.
(All images are by Finch Photography)
Subscribe to:
Posts
(
Atom
)